Sunday 28 October 2018

Simple Candy Tutorial

It's been ages since I last posted on here. I'm mostly active on Instagram now, but I thought that for a tutorial, the good ole blogging format is best. Since it's very nearly Halloween, I'm going to share a very simple candy tutorial here.


Materials: All you need is some paper punches, shrink plastic and some sharpies/permanent markers.

I used 1 cm paper punches for the gummy bears in the picture. You can use larger punches; they'll just make larger sweets. As for the shrink plastic, you can buy sheets of shrink plastic, or you can look around in your recycling for some clear plastic packaging. All you need to do is make sure that you can see this symbol on it: 

The other types of plastic don't shrink. Once you have your materials, just punch out some shapes. If it gets too hard, punch some aluminium foil to sharpen your paper punches. 


Colour in both sides with your permanent marker.


And bake in the oven for about 3 or so minutes. I use a little toaster oven. I recommend keeping a close eye on the plastic as you are baking it and taking it out as soon as it stops warping and shrinking. Also, bake on a piece of baking paper. And ta-dah! You've now got some teensy tiny candy pieces, perfect to fill up your miniature trick or treat bags with.


Tuesday 6 February 2018

Ribbon Dress Tutorial

I spent my holidays working on some sewing. I am a complete novice with regards to any type of sewing, and in the past I've just glued dresses together, lol. Since getting into Cu-Poche, I've wanted more clothes for them. The official clothes are expensive, so I've been working on making some simple dresses for them. It's a bit of a 'cheat' since the dresses were made by sewing bits of frilly elastic ribbon together. I've also used this method (but with completely different measurements) to make some Sylvanian dresses before. This tutorial will be focused on Cu-Poche measurements. Forgive me if I'm not very clear. I'm still very much a sewing newbie. :P


Cut some ribbon with the following measurements. Depending on exactly what kind of lace you get and whether you end up sewing the lace lower or higher on your ribbon, you might need it a bit longer.


Sew the three longer layers overlapping each other. The 6.5 cm one should be in front, followed by the 7cm one behind that and the lace right on the bottom. I tend to sew the elastic parts really closely to each other.


Take the smallest piece of ribbon, and fold down the sides and sew them. This part of the ribbon will be the top. You should have a piece that measures about 1.5cm at the elastic base.


Then fold down the top and sew that down with a basic gathering stitch. You'll have to measure your ribbon against your doll to make sure you've folded down enough. When you reach the end, pull on the thread to make the fabric scrunch up until it's about the same length as the bottom elastic area. Tie it off.


Attach the small elastic top to the skirt. Then I fold the dress in half and sew the skirt together. Make sure to measure the skirt against your Cu-Poche's waist before deciding where to sew it together.


Sew on a ribbon for the neck. I didn't take measurements for the ribbon, I just measured it against the body until it looked right.


Tada! Now you have the base dress! The elastic is nice and stretchy so the Cu-Poche body should be able to slip easily into it. For Sylvanians, instead of sewing the back together I sewed on a metal stud instead.


Add any decorations and embellishments you like. :)


Sunday 19 November 2017

Cu-Poche


I saw some Cu-Poches on AmiAmi and fell in love. I've seen them online before and just kinda brushed them off because I thought they looked a little weird. I think it's the joints? They actually look pretty awkward and unattractive, IMHO. The ones I saw were from the main line which focuses on articulated action figures with molded clothing. 

But then I saw how they look in fabric clothes and there was no saving me. Soooo cute! I greatly prefer their spin off 'doll' line, Cu-Poche Friends because of the real fabric. I ended up pre-ordering Akazukin, but I also picked up Sayaka Miki in the mean time. I couldn't resist her adorable face. Like Nendoroids, they Cu-Poche has swappable face plates. I'm waiting for the basic body to be released in December so I can swap out Sayaka's current body. I actually don't mind her current body--her design was my favourite in Madoka Magica. But the molded clothing and details get in the way of redressing her and even limits her articulation in some places (ie her skirt gets in the way of her being able to get into a sitting pose). And I've read that Akazukin is due to be released on the 24th, yay!

The more I play around with this figure, the more it reminds me of Pinky St for some reason. I think it's the swappable faceplates and hair. All the fun of a highly articulated doll but without the bother of (ugh) real doll hair. Me and real doll hair don't mix. I love dolls, but I really hate having anything to do with their hair. Also, Cu-Poche has a magnetic stand! It's my first experience with anything like it, and it's awesome! So much more versatile than a Nendoroid's stand, and it also comes with similar plug in the back bits if you need that extra stability or if you want to do a flying pose.

Monday 18 September 2017

Hasegawa 1/12 scale kits (capsule and crane machines)

I got these kits after seeing them on Flickr user MurderwithMirrors's feed.


I am currently obsessed with miniature gashapon machines (capsule machines), and these kits were really fun to put together and customise. Some people have had issues with the crane machine kit, so I was extra cautious while putting it together. That said, I nearly accidentally snipped off a hinge anyway. I enjoyed these kits so much that I put in an order for another capsule and crane machine, and a couple of the arcade machine kits. I was also eyeballing the Taiko Drum Master arcade kit but couldn't justify it at the time. All the items in my shopping cart were adding up. Maybe next time. I'm thinking of setting up a little 1:12 arcade room.

The crane game came with anime girl figure boxes as the prizes, but I wanted to make a little Sylvanian one. The miniature Sylvanians even fit down the prize chute (a little hard to remove though). I'm getting another crane machine kit to make an Animal Crossing themed one.


The crane game is a bit tall for Sylvanian figurines and Nendoroids, so I've stuck them on a stool. Donna Butterglove is trying to get something that is not a Chocolate rabbit. But with as with all crane games, getting ANYTHING at all is pretty tricky!


That feeling you get when your prize gets stuck and you've run out of money.


This Nendoroid is one I actually bought solely to steal part of a stand off of (after I broke Isabelle's stand :(). She was like only $10 on Rakuten for some reason. She's just been packed away in a box for several years, so I'm glad I've found a reason for digging her out again.

The capsule machine kit came with a sheet of inserts that you could cut out and use, but I wanted some Sylvanain themed machines so I printed out my own. I used pictures from real Sylvanian gashapon machines. These capsule machines also doesn't actually work, which is a pity. I have some machines that do work, and I'll do another post with them in the future. I've used the shells from the working machines in the pictures because the 'capsules' from the kit don't actually open--in fact most of them are solid single colour balls.


Donna: What did you get?
Shelly: A chair and yet another Chocolate rabbit. I have fifteen of those already. They're taking over my room.You?
Donna: *cracks open capsule* Also another Chocolate rabbit. I don't even want to know how many I already have.


I found some smaller Sylvanian toys to put into the capsules. The larger bunny in the above picture doesn't actually fit, unfortunately. Can't put the other half of the shell on.


Monday 14 August 2017

More Mini Books

I'm currently making some books for Jona Wanders. It's a good way to get back into making miniature books again. I tend to spend too much time on one project and completely burn out on it for several months afterwards. I still need to fill up my Grand Mansion bookcase, stock my newsagent/bookseller and my library.

I wanted to make some Lord of the Rings books, and oddly enough, the best printable hardcover 'book covers' are from the extended DVD cases. I couldn't believe how hard it was to find nice, printable LotR covers! I also experimented with a pull out map. The version with the outline looks better, I think. I also learned that it was better to use coloured paper or cardstock rather than scrapbooking paper with one blank side. The white shows through. You'd think that would have been obvious to begin with. :P

First attempt:


Second attempt; a three book version with an outlined map


I needed to do coloured pages with lots of two page spreads for this lot, so I experimented with a different method of 'binding' the pages. My previous books were put together with glue and thread, so a bit more like how real books are bound. These are just folded and glued. It actually worked really well and open nicely.


The atlas is a mish mash of stuff from various sources. The insides were taken from a student 'World Atlas'.


Photoshoped a random book cover to make encyclopedia volumes. Makes for a nice little set with room to add more future volumes.


This is my personal favourite cover. I photoshopped the year out and added 'annual' so the book cna be used whenever. Not really sure what should be in an almanac, so I just took what I could find from the Old Farmer's Almanac website. I think I ended up with more articles about plants and cooking than actual weather and planting stats.


I find that adding that little bit of string on the spine to be the most fiddly bit. I think it makes the book more complete though, so I figure I should add it anyway. The books will need a sealer to protect the covers too, later. 

Sunday 9 July 2017

Sylvanian Cake Shop Capsules Series 2 Review

I got the second Sylvanian Cake Shop gashapon series last week. The first series has already been reviewed by Terra of Green Bear Shire so I'll just be focusing on the second series. Also trying something new--hosted all the pictures on blogspot rather than on multiple sources, because of Photobucket's dramatic attempt at self-destruction.


The second series is very pink. I actually quite liked the soft mint green of the first series, but the pink grew on me as I took the pictures. The sets came in colourful little ball capsules. These capsules are usually sold in capsule machines, where you insert a coin and get a random one in return. 

Each capsule had an insert with printed doilies to cut out, and three of  the sets them came with a sheet of stickers and a tiny, clear plastic bag. I scanned the doilies and the sticker sheet:

The first set is a cupcake stand with four cupcakes. The bunny cupcake is the best! The stand looks a bit empty on its own, so I'd fill it up with more items. I find that the cupcakes from the older Sylvanian Sweet Shop fit really nicely!


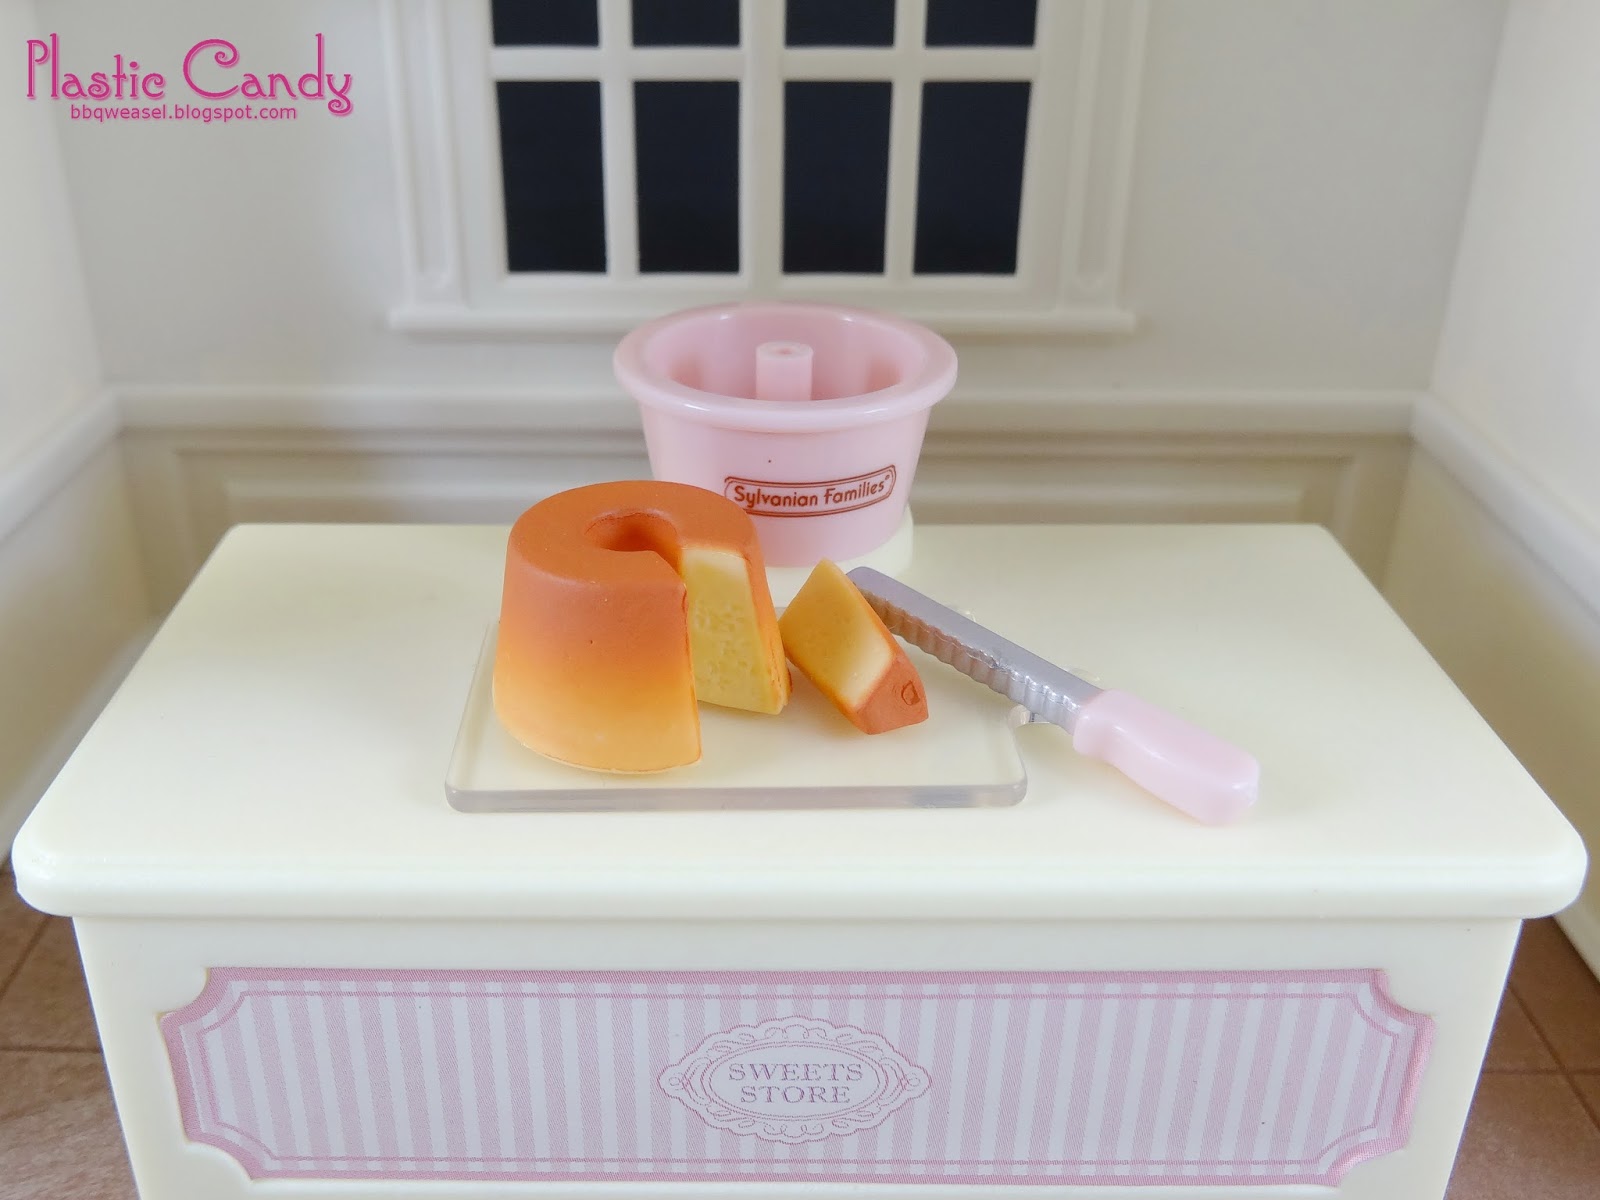
The second set is a bundt cake, bundt cake pan, a clear cutting board and a knife. The knife and the board are the same as the one from Series 1, save for the colour. The cake fits perfectly into the pan. 


The third set contains a yellow tart, a cake server and a serving platter with a dome. This entire set is very similar to the one in Series 1. It's not an out right rehash, but they definitely share some of the same parts. One odd, small difference is the size of the tart. The base of this set's cheese tart is just a little bigger than the berry tart in Series one. It's just big enough that it gets stuck in the dome if you push the dome all the way down when covering the tart. It's not stuck tightly, and there's not paint to rub off on the sides of the tart so it's not really a big deal to me. One issue to look out for if you leave the tart stuck to the dome long terms is for plastic reactions. Some plastics can melt a little when it's left in contact for too long with a different kind of plastic, but I have no idea whether or not it would be an issue for this set. 


The fourth set contains three macarons and an iced biscuit. The macarons are adorable! I love the paint finish on those. The box is a re-used part from Series 1. The lid doesn't shut properly if you put all three macarons in there. The 'ears' on the macarons are a little too big and get in the way! 


The last set contains three pastries, a wire rack and a pair of tongs. Again, more re-purposed molds. I'm not sure what the pastries actually are, cream puffs or doughnuts, maybe?


It may seem like I'm complaining a lot about re-used molds, but I'm not actually bothered by it. I've quite enjoyed seeing how the old molds have been re-purposed and used to form new sets. These toys are quite inexpensive, and retail in Japan for about 200 yen each, roughly $2. They are well made for the price. That said, Series 2 seems to have a little less quality control overall than Series 1--namely the pieces not quite fitting together. Still, I really like this set overall, and it's a good way to fill up that Sylvanian cafe or shop with more goodies!

I think the colour scheme goes really well with the old Sweets Store. I'd been wanting to repaint the Sweets store blue and turn it into an ice cream shop to go on top of my Seaside Restaurant, but I don't know if I can now! It's just so adorable, and the Sylvanian Club poodle girl makes a great owner. I have a weakness for cute pink stuff. 


Thursday 8 June 2017

New SF haul

Blog is kinda dead, haven't been feeling like much of anything lately. Thought I'd post about my latest lot of SF, since I do like having a little record of what I got in the past when I look through my old posts.

---

My vintage lot arrived! The only reason I was even on FB at the right time to buy these was because I got my pants caught in the wire wheel attachment of my husband's drill. I had been cleaning some rust off the prize machine birdcage. My fault for wearing baggy pants! It caught in the drill and ripped half off my leg. I was browsing FB while waiting for my husband to come and help free me. 

There are some regular dollhouse bits mixed in. I accidentally broke the dollhouse scissors becuase I thought it would pull apart but I ended up snapping the handles instead...

I really hadn't expected the sewing machine set to be complete. That and the little ceramic set with the brown design. All of it is in really good condition! I'm especially stoked about the brass bed, I've been wanting one for ages. It fits so well in the Highfields farmhouse. I'm really impressed by the detail in the vintage accessories. The pain palette actually has molded on paint--it looks textured and real. The little tubes of paint are all individual pieces (stickers need regluing though) and the picture canvas is actually molded and textured to look like a real canvas under the painting sticker. Also, the green slide has such a cute design on it that wasn't apparent in the seller photos.

Vintage SF haul

Also pretty stoked about these figures. They're all in pretty good condition, except for maybe the father Babblebrook who has some discoloured spots. I think the Honeypot bride is missing a bow on her veil. And my first Catwood! She's adorable. VIntage SF haul